JVC GR DVP 1 User Manual

Browse online or download User Manual for Camcorders JVC GR DVP 1. JVC GR DVP 1 User's Manual

  • Download
  • Add to my manuals
  • Print
  • Page
    / 10
  • Table of contents
  • BOOKMARKS
  • Rated. / 5. Based on customer reviews
Page view 0
Mounting method and operating method
for each part
1 Tighten the camcorders grip strap.
2 Remove the four buckles on the marine
case and open the front lid.
3 Align the Power Lever with the “OFF”
mark on the marine case.
4 Set the camcorders Power Switch to
“OFF”, then open the LCD monitor and
insert the camera into the marine case.
Place the included anti-fogging silica gel in the gap between the
camcorder and the marine case to prevent fogging in the marine
case.
Only the BN-V107 battery can be used.
Remove the grip belt or strap from the camcorder before inserting
it.
If the camcorder’s Power Switch is set to “
”, perform settings as
required then insert the camcorder into the marine case.
5 Fit the Zoom Lever projection on the
marine case over the outer groove of
the Power Zoom Ring on the
camcorder, making sure that it is
securely fit.
If the camcorder’s Power Switch
is not set properly when the
camcorder is placed in the marine
case, it could break and/or it could
damage the Power Lever aligning
boss on the marine case.
6 Before sealing the marine case, check that there is no sand, dirt, or
other foreign matter on the O-ring mounted on the front lid or on
the O-ring contact surface on the main
unit.
Also make sure that the inserted silica gel
bag is not pinched. If you dive with foreign
matter trapped in these areas, water will
leak.
7 Check that the O-ring on the front lid is
correctly mounted in the groove, then press
in the front lid. Flip down the four buckles
in the directions indicated by the arrows in
the figure on the right to seal the marine
case.
8 Turn the marine case’s Power Lever in the
direction of the arrow to set the
camcorders Power Switch to “
” or “ ”.
The camcorders Power Lamp lights.
9 To start video recording, press the Record-
ing Start/Stop Button.
To stop video recording, press it again.
Press the Snapshot Button to perform
Snapshot recording.
0 The zoom can be adjusted with the Zoom
Lever.
Telephoto : turn the lever to the left (
)
• Wide angle : turn the lever to the right
(
)
! When you are finished shooting, set the
marine case’s Power Lever to “OFF” (in the
direction of the arrow) to set the
camcorders Power Switch to “OFF”.
The camcorders Power Lamp goes out.
NOTES:
The O-ring is made from rubber and is mounted on
the front lid.
Refer to the camcorders instructions for more
information.
POWER
ON
OFF
WR-DVP3U
ZOOM
SNAP SHOT
START/STOP
POWER
ON
OFF
1
2
3
3
56
9
78
4
Users Manual ENGLISH
Names of the parts
Please read before use.
This marine case is a precision instrument designed to permit safe
video recording under high water pressure. Please pay careful
attention when handling the unit before and after use, as explained
in this users manual.
Each part of the marine case has been subject to strict controls
during the manufacturing process, and the individual functions
have faced stringent tests during the assembly process. Each marine
case has also had to pass water-proof inspections using high-
pressure water testers. However, damage can sometimes occur
during transport and distribution, or during storage after purchase,
so before diving always carry out the following pre-use test to
verify safety.
Pre-use test
Be sure to perform the following pre-use test before diving.
1. Before mounting the camcorder inside the marine case, dive
with only the empty marine case and test for water leaks.
Check for leaks at a depth of 3 m where there is no water
pressure. Allow 5 or 6 minutes to ensure there are no leaks. Be
sure to perform this test to ensure the safety of your camcorder.
2. The following are some common causes of water leaks:
A. The marine case is used without attaching the O-ring.
B. The O-ring is not mounted in the correct position.
C. The O-ring is damaged or deformed.
D. There is sand, dirt, hair or other foreign matter on the O-ring.
E. There is sand, dirt, hair or other foreign matter on the contact
surface of the O-ring or on the inside of the lid.
F. The provided strap or silica gel bag is pinched inside the
marine case when the lid is closed.
To protect your camcorder and ensure optimum use, keep the
examples listed above in mind when using the marine case.
JVC accepts no responsibility for water leakage or damage to
anything inside the marine case (camcorder, cassette, etc.) due to
careless usage of this product. Be sure to follow correct procedures
when using the marine case.
For Digital Video Camera
GR-DVP1, GR-DVP3
Before use, this unit must be pre-tested
to check if there is any water leakage.
WR-DVP3U
Marine Case
LYT0839-001A
Front glass
Strap
Fit the Zoom Lever projection
over the Power Zoom Ring
Projection
Power Zoom
Ring
1 Marine case front lid
2 Main unit
3 Buckle
4 Grip attachment holes
5 Power lever (POWER)
6 Recording start/stop button (START/STOP)
7 Zoom lever (ZOOM)
8 Snapshot button (SNAP SHOT)
9 Grip strap
O-ring
Bottom view
Grip strap
ZOOM
START/STOP
POWER
ON
OFF
ZOOM
START/STOP
POWER
ON
OFF
Snapshot
button
ZOOM
START/STOP
POWER
ON
OFF
Recording
start/stop
button
Page view 0
1 2 3 4 5 6 7 8 9 10

Summary of Contents

Page 1 - Marine Case

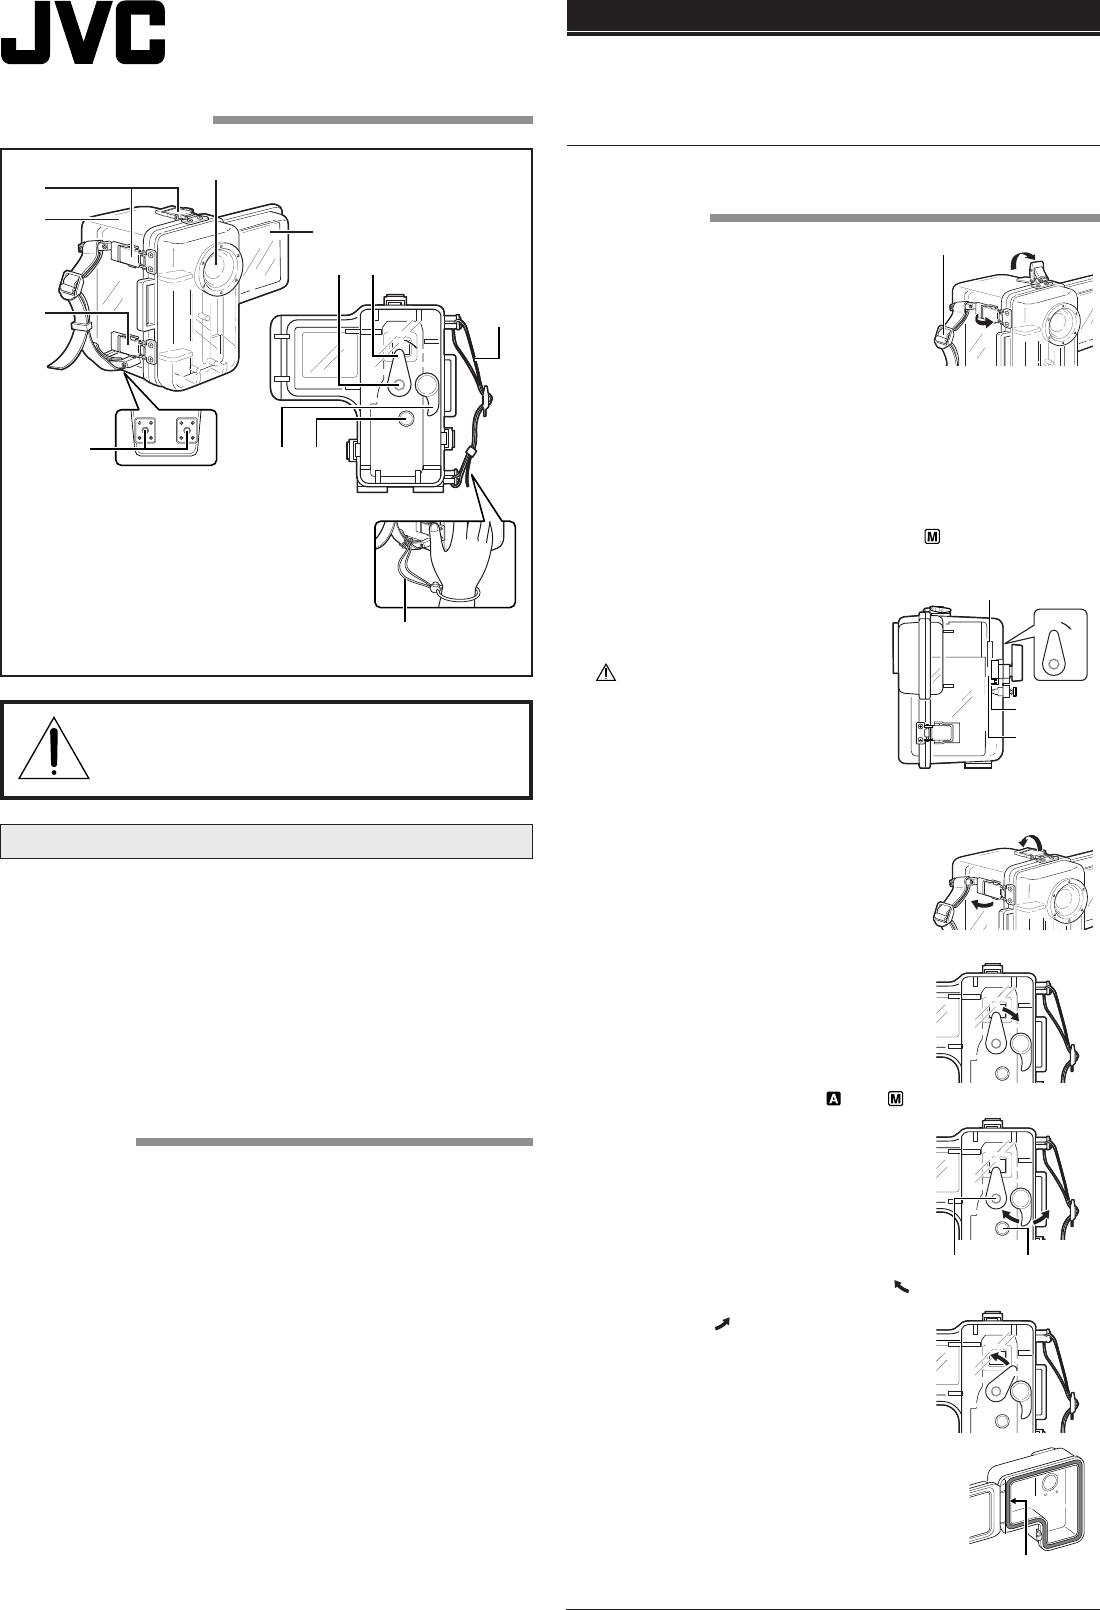
Mounting method and operating methodfor each part1 Tighten the camcorder’s grip strap.2 Remove the four buckles on the marinecase and open the front l

Page 2 - Main specifications

ITPrecauzioni e durante l’impiego1 Non utilizzare mai i seguenti prodotti chimici per effettuare lapulizia, un trattamento antiruggine, un trattamento

Page 3 - Unteransicht

ENUsage precautions1 Never use any of the following chemicals for cleaning, rust-proofing, fog prevention, repair, or other purposes.1) Do not clean t

Page 4 - Griffanbringung

Installieren des Camcorders und Handhabung derUnterwasser-Gehäuse-Teile1 Die Griffbandschlaufe des Camcordersstraffen.2 Die vier Schließen des Unterwa

Page 5 - Coffret marine

DEVorsichtsmaßregeln für den Gebrauch1 In keinem Fall die folgenden oder ähnliche Chemikalien zurReinigung, Vorbeugung gegen Rostbefall,Kondensationsn

Page 6 - Caractéristiques principales

Méthode de montage et méthode defonctionnement pour chaque pièce1 Serrer la courroie poignée du camescope.2 Retirer les quatre boucles sur le coffretm

Page 7 - Caja submarina

FRPrécautions d’utilisation1 Ne jamais utiliser l’un des produits chimiques suivants pour lenettoyage, la protection anti-rouille, la prévention contr

Page 8 - Especificaciones principales

POWERONOFFWR-DVP3UZOOMSNAP SHOTSTART/STOPPOWERONOFF1233569784Manual del usuario ESPAÑOLNombre de los componentesLe rogamos que lea antes de usar.Esta

Page 9 - Custodia subacquea

ESPrecauciones para uso1 Nunca emplee ninguno de los siguientes productos químicos delimpieza, antioxidantes, antiempañamiento, reparación u otrosprop

Page 10 - Caratteristiche tecniche

WR-DVP3UZOOMSNAP SHOTSTART/STOPPOWERONOFF1233569784Manuale Utente ITALIANONomi delle partiLeggere prima dell’usoQuesta custodia subacquea è un disposi

Comments to this Manuals

No comments