Jvc GR-DVX PRO User Manual Page 25
- Page / 84
- Table of contents
- TROUBLESHOOTING
- BOOKMARKS
- GR-DVX PRO 1
- PRECAUTIONS 2
- SAFETY PRECAUTIONS 3
- PROVIDED ACCESSORIES 4
- ABOUT DV 6
- CONTENTS 7
- Installing The Battery Pack 9
- GETTING STARTED 10
- Date/Time Settings 11
- Recording Mode Setting 13
- Grip Strap Attachment 15
- Tripod Mounting 15
- Remote Control Unit 17
- RECORDING 19
- Time Code 21
- Interface Shooting 23
- Journalistic shooting 23
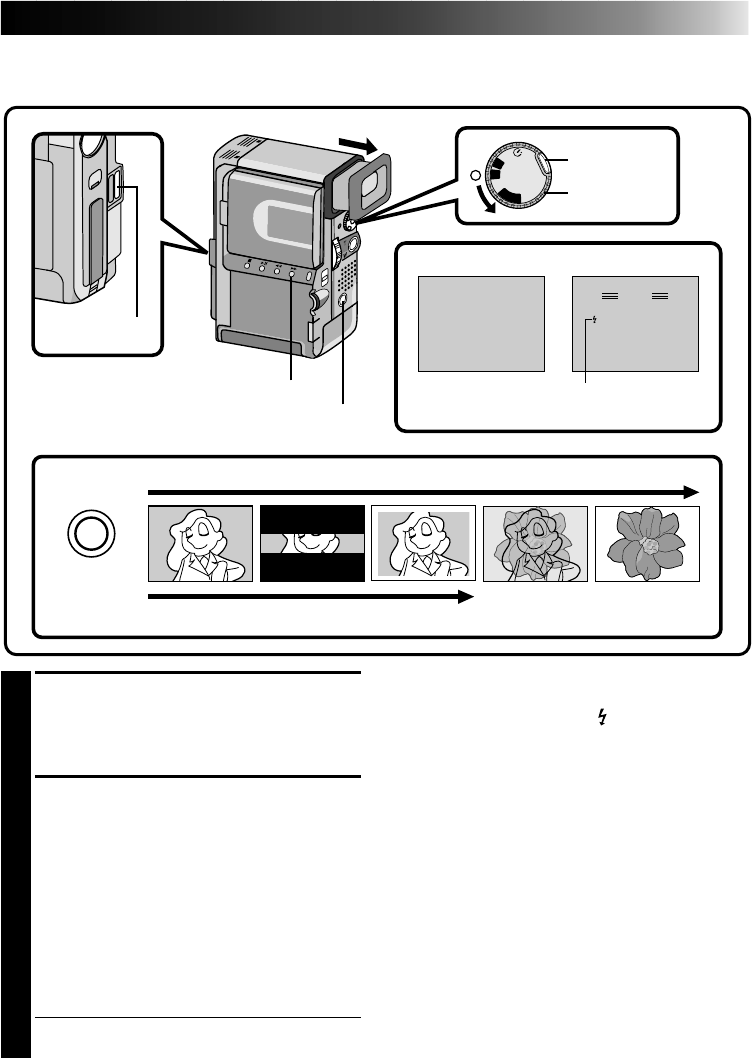
- SNAPSHOT 25
- Adjusting Flash Brightness 27
- Self-Timer 29
- REC MODE (Recording mode) 31
- WIDE MODE 31
- Z pg. 11). Set 33
- Z pg. 28) 35
- Fades and Wipes 37
- START RECORDING 39
- Manual Mode Item 45
- Exposure control indicator 45
- Lock button 45
- Power Dial 45
- White Balance Adjustment 47
- PLAYBACK 49
- Playback Effects 51
- Z pg. 52) 53
- CONFIRM POWER-OFF STATUS 55
- ATTACH AND LOCKS 55
- SUPPLY POWER 55
- Z pg. 56) 57
- MAKE CONNECTIONS 58
- START PLAYBACK 58
- PAUSE RECORDING 58
- END RECORDING 58
- Brand Setting 59
- (Cont.) 60
- Random Assemble Editing 60
- SET EDIT-IN POINT 61
- SET EDIT-OUT POINT 61
- USE FADE WIPE ON SCENE 61
- TRANSITION (IF NECESSARY) 61
- For More Accurate Editing 63
- Audio Dubbing 65
- Insert Editing 66
- TROUBLESHOOTING 67
- AFTER USE 72
- Camcorder 73
- Docking Station 75
- 1 min 76
- No. FUNCTION 77
- Warning Indications 78
- CAUTIONS 79
- SPECIFICATIONS 81
- GLOSSARY OF TERMS 82
Related products and manuals for Cameras Jvc GR-DVX PRO
 (56 pages)
(80 pages)
(56 pages)
(80 pages)
 (112 pages)
(88 pages)
(112 pages)
(88 pages)
 (104 pages)
(112 pages)
(104 pages)
(2 pages)
(44 pages)
(104 pages)
(104 pages)
(112 pages)
(104 pages)
(2 pages)
(44 pages)

 (216 pages)
(72 pages)
(39 pages)
(64 pages)
(52 pages)
(7 pages)
(68 pages)
(88 pages)
(96 pages)
(92 pages)
(216 pages)
(72 pages)
(39 pages)
(64 pages)
(52 pages)
(7 pages)
(68 pages)
(88 pages)
(96 pages)
(92 pages)
© 2020, manymanuals.com. All rights reserved. | 1.039 s |
 Manymanuals.com
 Manymanuals.de
 Manymanuals.fr
 Manymanuals.it
 Manymanuals.pl
 Manymanuals.cz
 Manymanuals.es
 Manymanuals-pt.com
Comments to this Manuals